Saturday 28 April 2012

BABY DARK RYE PITTA BREAD POCKETS


I like making pitta breads. They are so easy to make. You can make them  in the oven or on the griddle, though I prefer to make them in the oven as 8 to 10 of them can be made in the same time versus cooking each one on the griddle.

When I was new to the world of cooking especially food from other parts of the world, I found myself totally enamoured by pitta breads. I didn't know how to make them, so I looked up recipe books but didn't find any recipe in any of the books available in the stores around.

Not one to lose hope or lose interest, I created my very own pitta bread out of the simple everyday bread slices. I cut the slices diagonally and with a sharp paring knife (used for fruit and vegetable carving) slit it right in the middle and created a pocket and filled it with salad. These were very very delicate bread pockets that could tear easily. There wasn't enough room to put in a falafel along with the salad so I grated my salad and chopped my falafel into tiny bits and enjoyed this version till I finally learnt how to make a pitta bread, the easiest of all breads.

It just looks mysterious.

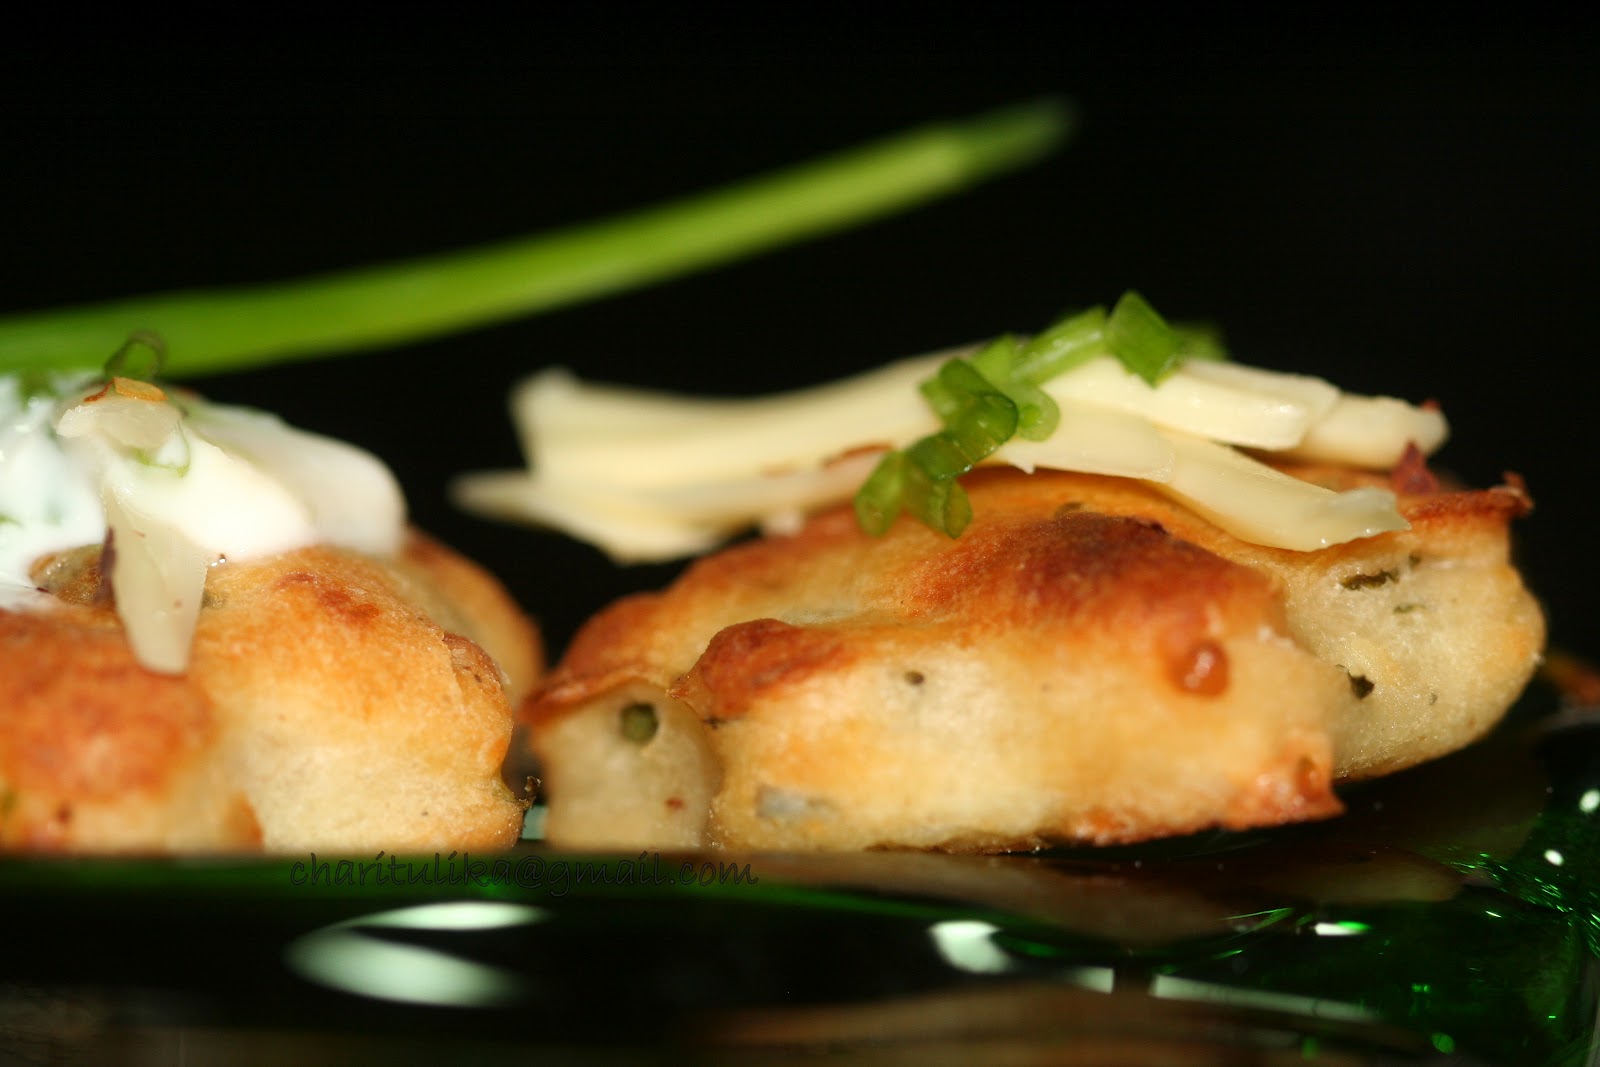
rye pitta bread pockets

I now make them with rye flour, corn flour (masa harina) and have been trying various combinations of flours and vegetables to add to the nutritive value of the pitta pockets. The use of different flours and vegetables gives a different colour to each one as it gives it's own unique flavour.

Dark rye flour gives a dark brown coloured bread. It is high in fiber content and low in fat. It is healthier than white flour and does not cause a spike in the blood sugar levels that white flour is known to cause. It gives a denser bread than white bread. Rye flour does not have a strong gluten hence I have added bread flour(strong white flour) to it. This facilitates the rise of the bread dough.
Pitta pockets are usually served with salad, hummus and falafal.

Recently I spent a lovely afternoon with my friends at a restaurant that serves pitta pocket sandwiches. With renewed interest in this scrumptious, delicious and nutritious sandwich I decided to make these for the week-end meal. It needs a little planning ahead. But once the hummusfalafal and the pittas are ready it takes very little time to put it altogether.

Perfect for a lazy week-end lunch.

PITTA BREAD WITH RYE
Ingredients:
makes 24 small/12 medium/8 large(with a diameter of 3/5/7 inches)
.Bread flour......................................350gm.
.Dark rye flour..................................150gm.
.Ground flax seeds............................1 Tbsp.
.Dry yeast(fast acting).......................2 tsp.*
.Baking powder................................1 tsp.*
.Bread improver...............................1 tsp.*
.Salt..................................................1 tsp.
.Sugar...............................................1/2 tsp.
.Dried mint leaves............................2 tsp.
.Red chili flakes...............................1 tsp.
.Water..............................................300ml +4 tsp.*

.Olive oil..........................................2 Tbsp to coat
.Black and white sesame  seeds........2 +2 tsp. for sprinkling

Method:
.Mix together yeast, bread flour, dark rye flour, ground flax seeds, baking powder, mint leaves, red
 chili flakes, salt and sugar.
.If using a dough maker mix all the above ingredients for at least 3 minutes using the balloon attachment.
 This will mix the ingredients well and aerate them too.
.Add the water and using the dough attachment knead the dough in the dough maker for 7 to 8 minutes
 till smooth, firm, soft and pliable.
.If kneading with hand you may have to knead for a longer time till the desired result has been achieved,
 about 15 minutes.
.Put the dough in an oiled glass bowl, turning it to coat evenly with oil.
.Cover with a plastic cling film and leave to rise for 1 1/2 hour to 2 hours till doubled in size.

.Knock back the air from the dough, cover and leave to rise again for 20 minutes.
.Divide the dough equally into 24 pieces of 34 gm. each and roll each one into a ball.*
.Cover and leave to rise for 20 minutes.
.On a lightly floured surface, roll each ball into a circle of 1/2cm. thickness.
.Sprinkle the mixture of the black and white sesame seeds and press down very lightly with the rolling
 pin to embed them.
.Cover with a tea-towel or plastic cling film and leave to prove for 30 minutes until risen and
 doubled in size.
. At this point the dough can be proofed for upto 12 hours. This will give a much softer bread.

 How to proceed:
.Preheat the oven to 220 degree C/ 425 degreeF/gas mark 7.
.Dust two or three baking trays (as required) with flour and preheat the trays in the oven for 5 to 7
 minutes.
.Put the prepared dough circles on the hot baking sheets and return to the oven immediately.
.Bake for 2 to 3 minutes on each side until puffy.*
.Remove and wrap immediately when hot in a clean, dry cloth to keep them soft and prevent from
 drying out.
.When cooled completely they can be stored in a zip-lock plastic bag.

.When using cut the pitta into half and stuff the filling into the opened up pockets and grill if liked.

Note:
*The yeast used should be of good quality.
.To check for the workabilty of the yeast you can alternatively mix the yeast, sugar and 1/2 cup of the
 water and set aside for it to rise. Stir to dissolve and add along with the remaining water to the
 flour. I skip this step as I buy the yeast when required.
*Baking powder helps the rye flour to rise.
*Bread improver helps in the texture of the bread.
*Water should be tepid in cold places. In warm places water at room temperature will do the work
 well.
*Basic water requirement for this bread is 300 ml. but I have added 1 tsp. extra for every tsp. of
 added ingredient such as the dry mint leaves, flax seed powder, and chili flakes.
*It is important that the dough is divided into equal sized balls as that will ensure even baking of all.
*It may take lesser or more time depending on the size, but do not leave it long in the oven as it will
 harden and you may end up with crisp bread. If that happens you can serve it with a dip as crisps
 with tea.

To make plain white pitta bread just substitute the dark rye flour i.e. making the bread flour quantity to be 500gm. Mint leaves, flax seed powder, chili flakes and sesame seeds too can be omitted. Remember to remove the extra water added for every tsp. of extra ingredient added, as mentioned above, (i.e remove one tsp. of water for every extra ingredient removed).
*recipes for falafel, humus, tzatziki and pitta pocket sandwich to follow.


Monday 23 April 2012

SPRING IN A BOWL


I love the spring.

Spring brings along memories of ropes tied on the huge Neem trees on the slope behind our hill-top home to make swings for us kids, of falling off the swings and tumbling down the hill, of festive lunches out on the huge verandah, of the lovely bajra khichdi that grandmom mixed with ghee(clarified butter) till it turned almost white and creamy, of my grandmom stitching summer clothes for us on those beautiful afternoons and getting the needle of the sewing machine right through her finger almost every other time, with mom trying to teach us how to embroider, and my aunt painting a beautiful piece of artwork on the canvas, while the honeybees worked at making another of their honeycomb nests in the lovely Maalti creeper that was laden with red and white flowers outside my grandfather's study.

It brings along with it not only the natural beauty but also a number of festivals in India, like Holi- the festival of colours, a festival loved by all kids, the only day we kids could get away with drenching all elders with coloured water.
I remember running after the beautiful colourful butterflies, flitting over the lovely phlox flowers that we kids called dog flowers, trying to catch them. The riot of colours in the garden is probably the reason why I am so enamoured with colours on the canvas, in my embroidery threads, in the way I decorate the house and even in my food. I love my dinner table full of colours, in fact I plan my menu based on the nutritive values and the colours in my dishes.


spring in a bowl


This dish is packed with colour and nutrients.

Ingredients:
serves 4

.Baby potatoes...............................10
.French beans.................................10
.Cherry tomatoes............................10
.Red bell pepper............................1 medium sized, diced into 1 inch pieces
.Yellow bell pepper.......................1 medium sized, diced into 1 inch pieces
.Baby eggplant................................8
.Pearl onions...................................10
.Lady fingers...................................10
.Carrot.............................................1 or 1 cup, cut into 1/2 inch thick roundels
.Baby corn.......................................10, cut lengthwise into halves
.Green chili(long and mild).............2
.Red chili(long and mild)................2

for the filling:
.Coriander leaves............................1/4th cup, finely chopped
.Mint leaves.....................................1/4th cup, finely chopped
.Ginger.............................................1 tsp. grated
.Garlic..............................................2 cloves, finely chopped(optional)
.Green chili......................................2, finely chopped
.Cumin seeds....................................2 tsp.
.Fennel seeds....................................2 tsp.
.Asafoetida powder..........................1 pinch
.Red chili powder.............................1 tsp.
.Turmeric powder.............................1/2 tsp.
.Coriander powder............................2 Tbsp.
.Garam masala powder.....................1 tsp.
.Dried raw mango powder(amchur)..2 tsp.
.Salt...................................................to taste
.Oil....................................................2 1/2 tsp.
.Oil....................................................for blanching vegetables


Method:
.Wash and dry all vegetables.
.Boil the baby potatoes.
.Slit the potatoes crosswise, taking care not to cut through.
.Trim the lady fingers, just to remove any unwanted black marks at the top and tail.
.Slit the lady fingers, taking care not to cut through.
.Trim the eggplants, just to remove any black unwanted marks on the stalk. Do not remove the stalk.
.Slit the eggplants crosswise, taking care not to cut through.
.Cut the carrots into 1/2 inch thick roundels.
.Slit the onions crosswise, taking care not to cut through.
.Dice the red and yellow bell peppers.
.Halve the baby corns and cut them lengthwise into half.
.String and cut the french beans into 2 inch pieces.
.Wash and dry the cherry tomatoes.
.Heat oil for frying in a deep pan and oil-blanche all the vegetables.
.Set aside.

for the filling:
.Wash and chop the coriander and mint leaves finely.
.Reserve 1 tsp of coriander leaves for garnishing.
.Heat 2 tsp. oil in a pan and add cumin seeds, fennel seeds and asafoetida powder.
.When fragrant add the green chili, ginger and garlic and saute for 1 minute on low heat.
.Add the coriander powder, red chili powder, turmeric powder, garam masala powder, dry raw mango
 powder, and salt and saute for another 30 seconds.
.Add the chopped coriander and mint leaves and saute for another 2 minutes on low heat.
.Remove from heat and cool.
.Fill this mixture into all the vegetables(except the cherry tomato) that have been slit and
 oil-blanched and set aside.
.In the same pan add all the prepared vegetables and toss for 3 to 4 minutes.
.Remove in a serving dish and set aside.
.In the same pan add 1/2 tsp. oil and saute the stuffed red and green chili for1/2 a minute or until
 they start to blister. Use these for garnish.
.Oil blanche the cherry tomatoes for 15 seconds and sprinkle on top. Serve hot.
.Garnish with the remaining 1 tsp. of chopped coriander leaves and the prepared chilies
 and serve hot.
.Alternatively just toss all the oil-blanched vegetables and cherry tomatoes along with the prepared
 filling and cook for 3 to 4 minutes.

note:
.For best results prepare this dish fresh.
.I prefer to keep the tops of the lady fingers but you can top and tail if you like.

Tuesday 17 April 2012

GOLDEN LEAFY CREPE


One Saturday morning while I was enjoying lazing in my bed with a book, my little daughter came in rubbing her tiny little stomach and said she was hungry but wanted me to cook her a breakfast that took me an hour to prepare. Puzzled, I asked her what she had meant by that. She said that meant she didn't want to eat bread and eggs, or cereal and milk or the other regular breakfast fares. She wanted me to make something exotic and different.

So there went my self-declared weekend-holiday from the kitchen.

But I was smarter and was not going to spend an hour in the kitchen. I quickly put together this 15 minute breakfast that looked like an one -hour dish.
This is a very filling dish which ensured that I got a four hour break before she came rubbing her tiny stomach again.


golden leafy crepe

This crepe is very nutritious.
Amaranth leaves, sorrel leaves and spinach leaves are a good source of Vitamin A, B6, B12, C, E, K, folate, thiamine, niacin, riboflavin, calcium, iron, potassium, zinc, copper,manganese and many other minerals. The leaves are a good source of dietary fiber.
Chickpea flour/gram flour/garbanzo flour is high in protein and carbohydrate content but has no gluten.
It also contains zinc, sodium, potassium, phosphorus, magnesium, iron clcium, folate, niacin, vitamin A and dietary fiber.


GOLDEN LEAFY CREPE:

Ingredients:
makes 10
.Chickpea flour(besan)...............2 cups
.Corn grits..................................1/2 cup
.Salt............................................1 1/2tsp.
.Red chili powder......................1 tsp.
.Fennel seeds.............................1 tsp.
.Garam masala powder..............1/2 tsp.
.Onion........................................1/4th cup, grated
.Amaranth leaves.......................1/2 cup
.Sorrel leaves(gongura).............1/4th cup
.Spinach leaves.........................1 cup
.Coriander leaves......................1/4th cup
.Yogurt.......................................2 Tbsp.
.Red chili...................................1 Tbsp. finely chopped
.Ginger.......................................1/2 tsp. grated
.Garlic........................................1/2 tsp. grated
.Water........................................1 1/2 cup
.Oil............................................1 Tbsp. +for shallow frying

golden leafy crepe (on a griddle)
Method:
.Wash all the leaves thoroughly. Squeeze out the water.
.Chop sorrel, amaranth and spinach leaves finely.
.Grate the onion, ginger and garlic.
.In a large bowl mix together all the dry ingredients.
.Add the wet ingredients and mix well to form a flowing but thick batter.
.Add all the chopped leaves and mix well.
.Heat a griddle. Using a paper towel oil the griddle or spray with cooking oil.
.Reduce the heat to low.
.Using a ladle pour out a little batter and using the back of the ladle spread it like a crepe.
.It may not spread out as thin as a crepe.
.Sprinkle a little oil along the edges of the crepe and let it cook for about 2 to 3 minutes or till nicely
 coloured and crisp. Cook the crepe on medium to low heat.
.Flip over and add a little oil along the edges and cook for another 1 minute or until cooked.
.Repeat till all the batter is finished.
.Flip and roll and serve with spicy coriander dip as shown in the picture.

note:
.Any salad filling can be filled inside the folded crepe.
.Corn kernels can be added to the batter.
.To complete the meal eat with a bowl of yogurt.
.Make a thick batter and you can fry dumplings of the same and eat with spicy coriander dip at tea-time.

Friday 13 April 2012

KINOCCHI (PUMPKIN GNOCCHI )


This one is the most flavourful of all Gnocchis, even better than the classic Potato Gnocchi.
Another one of those intimidating dishes, a mystery for people, for whom this is not a staple.

Go to a stylish up-market gourmet Italian restaurant and they will serve you 2 to 3 pieces of this mouth-watering dish on a humongously large plate and you wonder if the server had eaten most of it while on his way to your table.
You want to cry, scream and feel sorry.
 Not any more.
Well, now I got that dish on my own table and yours and in a large quantity too.

I always got away at my parties when I made this dish, with my friends thinking the world of me and talking about the hard work I had put in, in getting the meal together.
Well, this one is so easy you'll be wondering why you ever thought it was difficult.
There goes my crown.....

Gnocchi is nothing but pasta made like a tiny dumpling and cooked in rolling hot boiling water till it rises to the top. It can be made ahead and frozen for upto 2 weeks at the most, though I never had the opportunity to keep it for a longer time as once my family gets to know of it's existence in my freezer and with my Basil Pesto always in my refigerator, I am absolutely rail-roaded into serving it for dinner or in the lunch boxes.
I serve it as a starter or as a cocktail snack for a party or as a side dish for a sit-in-dinner.


Pumpkin is such a lovely gourd-like squash, colourful and flavourful. I use it to make breads, rissotto, gnocchi, soup, as a filling in breads or on Bruschetta, as a dip, as a side dish served in classic Indian style and many more.
Roasting it in the oven adds to the flavour. It's skin and seeds too are eaten.
It is high in fiber, contains zinc, protein, and vitamins. It is known to be anti-inflammatory, anti-oxidant, anti-carcinogenic and anti-diabetic.
It's seeds are used to make oil and are rich in magnesium, manganese, phosphorus and essential fatty acids that help in maintaining healthy blood vessels, nerves and tissues.
Add a dash of the pumpkin oil to add flavour to pumpkin soup or roast the seeds and eat just 1 gram to get the tryptophan equivalent to that in 1 glass of milk.

I have given this recipe a new name just to shroud it in a little mystery.
KINOCCHI.


kinocchi (as a cocktail snack)


KINOCCHI (AS A COCKTAIL SNACK)
Ingredients:
makes 76 pieces(good for 3 persons if used as a side dish)

.Pumpkin mash....................2 cups, of pumpkin roasted and mashed
.Fresh sprigs of Thyme........6
.Black pepper powder.........1 tsp.
.Olive oil.............................1 Tbsp.
.Egg yolk..............................1*
.Plain flour...........................1 cup
.Parmesan cheese.................1/2 cup
.Nutmeg powder...................1/4th tsp.
.Dried basil leaves...............1/2 tsp.
.Fresh thyme leaves..............2 sprigs, leaves finely chopped
.Dried oregano leaves..........1/2 tsp.
.Salt......................................to taste
.Lime juice...........................1 tsp.


for the cream sauce(bechamel/white sauce):
.Butter....................................2 Tbsp.
.Plain flour.............................1 1/2 Tbsp.
.Salt........................................1/4th tsp. or to taste
.Black pepper powder............1 tsp.
.Sugar......................................1 tsp.
.Cheddar cheese.......................2 Tbsp.
.Milk........................................3/4th to 1 cup, lukewarm


.Pre-prepared basil pesto..........4 Tbsp.
.Olive oil...................................1 tsp.
.Garlic.......................................1 clove, finely chopped
.Red and Yellow capsicums......cut into cubes for garnish
.Few basil leaves.......................for garnish

Method:
for the kinocchi:
.Cut the pumkin into halves and remove seeds.
.Poke the flesh with a fork and sprinkle a little salt, black pepper, olive oil and 4 sprigs of thyme.
.Wrap in Aluminium foil and grill in the oven for 1 hour.
.Remove the foil and grill further till a few charred spots appear and is well cooked, approx. 20
 minutes.
.Scoop out the flesh with a spoon and mash.*
.In a large bowl put in the grilled and mashed pumpkin, plain flour, the remaining fresh thyme, chopped,
 dried oregano and basil leaves, freshly grated nutmeg, egg yolk, salt, pepper and parmesan cheese.
.Mix well till all the ingredients are well blended and bring together to make a soft dough.
.The dough will be very sticky and moist.
.Using a measuring spoon dipped in dry flour scoop out 1/2 Tbsp of the mix and shape into ovals
 looking more like large cashew nuts. Using a fork create a design on the dent by pressing in down.
.Meanwhile boil water in a large pan and  a little salt and oil.
.Add the prepared raw kinocchi and bring to a rolling boil. 
.Cook the kinocchi till they float to the surface, about 5to 6 minutes.
.Remove and cool.

for the white sauce:
.Melt butter in a pan. Add the flour and cook it on low heat till it becomes fragrant and begins to
 change colour, stirring continuously.
.Remove from heat and add lukewarm milk, stirring continuously taking care to remove any lumps*.
.Return to heat and bring to a boil. Lower the heat and cook for 1 to 2 minutes till the sauce thickens
 and coats the back of the spoon.
.Add the cheddar cheese, salt, sugar and black pepper powder. Mix well.

kinnocchi served as a cocktail snack

 
How to proceed:
.Add 4 Tbsp. of the pre-prepared basil pesto to the white sauce and mix well.
.Check for seasoning.
.Heat 1tsp. olive oil in a pan. Add chopped garlic and saute for 1/2 a minute.
.Add the prepared kinocchi and toss gently.
.Add the prepared sauce and mix well tossing gently, coating each piece well with the sauce.
.Roast 4 Tbsp. pinenuts and saute red and yellow capsicums for 1 minute and set aside.
.Take a decorative toothpick and put the red and yellow capsicums and a folded basil leaf and
 finally the kinocchi.
.Put on a serving platter.
.Garnish with the roasted pinenuts, and a little freshly ground black pepper and serve hot.

note:
*Egg yolk can be omitted from the recipe.
*One 1.6 kg pumpkin yields about 4 1/2 cups of puree. Use as much required for this recipe and
freeze the remaining into cubes to be used in pumpkin bread or a soup or just make some more
kinocchi.
*At this point Kinocchi or pumpkin gnocchi can be frozen in freezer safe plastic bags.
*If lumps do form, do not fret for a moment. Just sieve the sauce and mash any lumps that may remain in
 the sieve before putting it back on heat.
.This recipe serves 3 people if eaten as a side dish garnished with red and yellow capsicums, asparagus, pinenuts, basil leaves and parmesan cheese shavings.

Tuesday 10 April 2012

BASIL PESTO (GENOVESE)


About 15 years ago when I had just begun discovering new tastes, I had the opportunity to savour this lovely, flavourful pesto served as a base sauce with cream for my favourite Potato Gnocchi at an Italian restaurant. I have ever since become a fan of this dish. This one is another one of my comfort foods and also that of my two kids. Every time my family goes to an Italian restaurant we get it made especially for us, if it is not on the menu.
I use this paste for sandwiches, pastas, most vegetables, even filling inside unbaked breads and Indian flat breads, in rice, on starters, as a dip and what-not. The list is endless.

Earlier I was quite intimidated by Pesto, thinking it was too difficult to make. But then I realised it was nothing but a Chutney that we Indians make with coriander or mint. The only difference being the addition of Cheese and Olive Oil. Once I connected this information it became so very simple and easy to make.
After a few attempts I have now perfected this recipe and it tastes just like the one used in the Potato Gnocchi in Pesto that I ate at the restaurant 15 years ago.
I make a fresh batch every week. I don't freeze this but fill it in a glass bottle and store in the refrigerator.
Genovese, the most common of the cultivars of the Mediterranean region, gives this pesto its unique flavour.

Basil leaves are very delicate and do not last long in the refrigerator and should be added at the very last moment to hot food to get the maximum flavour. They taste amazing in salads.


basil pesto (genovese)


BASIL PESTO (GENOVESE)
makes approx. 1 cup

.Sweet Basil leaves......................3 cups tightly packed
.Garlic.........................................3 large cloves, chopped
.Parmesan cheese........................3 Tbsp.
.Pine nuts.....................................3 Tbsp.
.Black pepper..............................1 tsp., crushed (or to taste)
.Salt.............................................to taste
.Extra virgin olive oil.....................1/2 cup
.Lime juice...................................2 tsp.
.Lime zest....................................of 1 lime

Method:
.Blitz together all the ingredients except olive oil.
.When well ground into a paste slowly drizzle 1/4th cup olive oil through the opening at the top of the
 processor.
.Remove into a glass jar and top with the remaining oil.
.Refrigerate.

Note:
.I like the paste to be slightly coarse, the pine nuts just a wee-bit smaller than semolina.
.Please do not use Thai basil or any other basil as the flavour is not the same.
.You can substitute the nuts with almonds or walnuts but I still prefer Pine Nuts.
.Please be safe when using food processors and do not stick your hand in the machine while it is 
 working.
.Switch off the machine after use.

Monday 9 April 2012

COCONUT CHUTNEY

Missing again, this time a little longer than before..

Well, it was my attention-seeking body.
It just refused to co-operate. First it shut down my throat so I couldn't speak, then it sent pain to my head.
I sent my white blood cells to mediate. They came back with the message that unless I get into bed and sleep for the next 4 days my body will not be allowed to work.
Finally, I gave in and cuddled up in bed giving my body as much attention as it needed and more.
And then my mind, watching my body get all the attention, loved the idea. So I groaned and sniffed a little more than required and enjoyed all the attention of my lovely family.
Now I am back.

Coconut is a tasty fruit. It is not a nut at all.
Coconut tree supports the cottage industries in many countries.
All parts of a coconut tree are used for various products. We get coir from the husk. Rope and jute from the trunk.
We can make brooms from leaves by peeling them to release the rib.
The coconut shell can be made into ladles, bowls and other decorative items.
Coconut fruit itself has many uses. It's water is refreshing. It's flesh is used in many cuisines around the world. The milk is used as a base in many dishes around the world.
Oil for cooking and hair oil and many more.

I love to eat the tender coconut and drink the water.


Coconut chutney


COCONUT CHUTNEY

Ingredients:
.Coconut......................................1/2 cup, grated
.Yogurt.........................................2 Tbsp.
.Coriander leaves..........................1/4th cup
.Green chili....................................3
.Roasted split chickpeas................2 Tbsp.*
.Tamarind......................................pea-sized piece
.Water...........................................1/4th cup
.Salt...............................................1/2 tsp.
.Oil................................................1 tsp.

for tempering:
.Oil................................................1 tsp.
.Asafoetida powder........................1 pinch
.Split chickpeas..............................1 tsp.
.Split black gram............................1/2 tsp.
.Mustard seeds..............................1/2 tsp.
.Dry red chili whole........................1, cut into 3 pieces
.Green chili.....................................1
.Curry leaves..................................3 to 4

Method:
.Dry roast the coconut* on low heat for 1-2 minutes stirring continuously, till it just begins to colour.
.Remove from heat immediately and put in the blender jar.
.In the same pan heat 1 tsp. oil and add split chickpeas(roasted chanadal).
.Add green chili and tamarind and fry all three till the split chickpeas change colour.
.Immediately remove from heat and add to the coconut in the blender jar.
.Add the yogurt, coriander leaves, salt and water and blend into a fine paste.
.Remove in a serving bowl and temper.

for the tempering:
.Heat 1 tsp. oil in a pan.
.Add the mustard seeds.
.When the mustard seeds start spluttering lower the heat to low and add the split chickpeas, split black
 gram, dry red chili, green chili and asafoetida powder.
.Do not stir till the chickpeas and blackgram start colouring, about 30 to 40 seconds.
.Mix well once coloured.
.Add the curry leaves and fry for another 5 seconds.
.Sprinkle this mixture on the coconut chutney as shown in the picture.
.Serve with the Steamed Kidney Bean and Rice Cakes.

Note:
*Roasted chickpeas are available in Indian speciality stores.
.If not available you can substitute with split chickpea (chana dal).
.I use the split chickpea in my chutney to give it the nuttiness and to bind the liquid in the recipe.
*Roasting coconut adds to its nutty flavour and removes the raw taste.

Wednesday 4 April 2012

STEAMED KIDNEY BEAN AND RICE CAKES (IDLI)


One incident in my life opened my mind to new foods, foods that I wasn't exposed to and also to creating new innovative dishes and serving them in a way that they would not usually be served.
It is invariably the most  hilarious experience of my cooking life. Of course not at that time, but later I found myself laughing over the incident.
I have to tell you that I was a kid myself, at the time. Everything was a competition.

My husband and I had a visitor who, just like my husband hailed from Tamil Nadu- a southern state of the Indian peninsula, who also happened to be my husband's boss at work. Every time he visited he was supposed to carry my favourite vegetables for me as they were unavailable in the state of Kerala where we were stationed at the time. In return I promised him the tastiest food he could ever get. This time I chose to make dosas, to show him that I, in spite of hailing from a Northern state could make great Dosas (tastiest crepes of the south).

Well, it didn't turn out to be so.

As soon as I put the batter on the griddle it crinkled up and looked like my favourite fabric, Chiffon.
Four chiffon dosas later I was in tears and ran to my husband for help. Creative man that he is, he made me sit down and went into the kitchen and piled the accompaniments onto a slice of bread along with the chiffon dosa, topped it with another slice, grilled the sandwich and served it with tomato ketchup.
With every bite the boss kept saying,"I love it, I know the taste but cannot place it. What is this?" All I told him was that it was a secret. Today I am letting out that secret.

I have created a new recipe that marries the north and the south.
Kidney beans are the second most favourite of most children in the Northern states of India, after cottage cheese. Rice is a staple in the Southern states as it grows in the coastal region. A staple dish of the South, idli, has probably never been made with kidney beans.
I have used these beans to create a filling tea-time snack, a complete meal for hungry children and adults.


steamed kidney bean and rice cakes

Kidney beans are rich in protein, soluble fibre, iron, potassium, thiamine, folic acid, vitamin B6, complex carbohydrates and others. Soluble fiber can help in lowering blood cholesterol.
They also contain a toxin that is responsible for bean poisoning. Soaking the bean overnight and cooking it for 10 minutes can deactivate the toxin.
Fermenting improves the nutritive values in the beans by removing the toxins. Yeast controls the offending sugars in the beans that produce gas during their digestion process.
Always discard the soaking liquid and wash the beans 4 to 5 times before using them.
Do not eat them raw.


STEAMED KIDNEY BEAN AND RICE CAKES

Ingredients:
.Kidney beans (rajma)....................................1 cup(raw)
.Black gram dal, split (urad dal, skinless).........1/2 cup
.Parboiled rice grits(idli rava)..........................2 1/2 cups*
.Flattened Rice(Poha)....................................1/2 cup
.Salt...............................................................to taste
.Water...........................................................2 cups or as needed

Method:
.Wash Kidney beans and soak them in 3 cups of water, overnight or for 6 to 8  hours.
.Wash black gram dal(urad dal) and soak in 2 cups of water, overnight or for 6 to 8 hours.
.Soak parboiled rice grits in 5 cups of water, overnight or for 6 to 8 hours.

.Throw away the water used for soaking the beans and the black gram dal.
.Gently remove the excess water from the soaking parboiled rice grits, without disturbing the settled grits.

.In a blender grind the black gram dal into a fine paste till buttery in texture. Put in a large bowl and set
 aside.
.Grind the soaked kidney beans finely and add the flattened rice and grind together till it is a fine paste.
.Add to the black gram dal.
.Grind the parboiled rice grits till about 1/4th of their original size.

.Add a little water to facilitate the grinding process.

.Mix all the pastes together, add salt and water to get the desired pouring consistency of the batter.
.Mix well to aerate the batter.
.Cover tightly with a cling film. Cover with a lid.
.Keep in a dark, warm and well-insulated place for 10 to 12 hours to ferment.

How to proceed:
.Take a well-oiled idli mould.
.Dipping right to the bottom of the prepared mixture*, put ladleful of the mixture into each mould till
 each is 3/4ths full.
.Stack the mould plates.
.Heat water about 1 inch high in the steamer and place the mould stack in it taking care to see that the water
 level is below the bottom plate.
.Steam the kidney bean and rice cakes in a steamer or a pressure cooker(without the whistle) for 12
 minutes(after the water in the steamer starts a rolling boil) on low to medium heat.
.De-mould these beautiful, airy and soft idlis (using a spoon)and serve piping hot with Coconut Chutney or
 the spicy red chili mix(molagapodi), plain yogurt or just with a dollop of unsalted butter or drizzle with chili
 oil.
steamed kidney bean and rice cakes

Note:
*Parboiled rice is partially boiled rice and it's grits are available in Indian speciality stores and are called
 Idli Rava. If not available you can use parboiled rice. Grinding this takes a little longer .
.Use 1/3rd of the quantity to make steamed cakes.
.Refrigerate the mixture well covered with cling film. Use 1/3rd of the remaining mixture to make crepes and
 the remaining batter to make spicy pancakes.(recipes to follow soon).
*The rice being heavy settles down at the bottom of the container, hence to get it into the ladle dip it right
 down to the bottom.
.Do not stir the mixture till you have finished making the steamed cakes as that will destroy the air pockets
 and give you dense steamed cakes.
.In case you don't have a mould don't fret just get creative and use well-oiled metal cookie cutters in a
 plate and keep it on a raised surface like an over-turned bowl inside the steamer.
.You can also boil the soaked beans for 10 minutes and cool them before grinding, to be absolutely safe.


Monday 2 April 2012

CHEESY POTATO AND CHIVE SCONES


I have been in love with Chives ever since I first ate them.

The first time I used them finally, was when I threw a surprise birthday party for my husband.
I was so proud of myself at having created a new recipe which was well liked by all at the party.
Imagine the rude shock I received when I was browsing in the recipe-book section of a well-known book store. I opened this tiny little book and found myself looking at the picture of my new creation.
Even the filling inside was almost identical, with two differences. My filling had nuts and dear dear Chives saved me from looking like a copy-cat.
My husband pacified me saying, "Great minds think alike".
Now when I see something similar to my creations, that is what I tell myself, smile and move on.
Ever since I had been wanting to do something special with this lovely herb and finally after six years have come up with something that has again made me fall in love with this slender herb.
These are great with evening tea as they are very light or as a starter/ appetizer in any party. They can be loaded with a topping or served with a dip. I like to eat them simply with a little cheddar and chopped chives on top.
The mild taste of the chives mingled with the onion flakes lingers on.


cheesy potato and chive scones

Chives are the smallest species of onions. They are milder in taste and are rich in vitamin A and C, calcium and iron and have trace amounts of sulphur. These are stems of bulbous plants and are slender, hollow and tubular, very much like the spring onions, only much thinner. They are known to be good for the circulatory system and have diuretic, stimulant and antiseptic properties but may cause digestive problems hence are not eaten as a main dish but used in little quantities in soups, or fish or with cheeses and as a garnish. Being similar but milder in taste and flavour these can be substituted by spring onions.


CHEESY POTATO AND CHIVE SCONES
gives 44 pieces

Ingredients:
.Self raising flour................................2 cups or 225gm.
.Butter.................................................2 Tbsp.
.Salt....................................................1/4th tsp. or to taste
.Crushed black pepper........................1/2 tsp.
.Crushed red chili flakes.....................1/4th tsp.
.Dried onion flakes.............................1/2 Tbsp.
.Potato................................................150 gm. boiled and mashed
.Feta cheese........................................25gm., crumbled
.Cheddar cheese.................................25gm. grated
.Chives...............................................2 Tbsp. finely chopped
.Yogurt(along with it's liquid)............3 Tbsp.

For garnish:
.Cheddar cheese...................................1/4th cup, thickly grated
.Chives.................................................1 Tbsp. finely chopped

  or

For  Cheesy Yogurt dip:
.Cheddar cheese...................................1/4th cup, finely grated
.Chives.................................................1 Tbsp. finely chopped
.Yogurt.................................................1/2 cup thick
.Salt......................................................to taste
.Black pepper.......................................1 pinch, crushed


Method:
.Sieve together self raising flour and salt.
.Roughly mash the boiled potato, just so that there are no pieces. Do not make it buttery as this will
 make the dough very sticky.
.Add all the ingredients except yogurt and using a fork mix well.
.Add yogurt and mix gently.
.Bring together into a dough. The dough will be slightly moist.
.Cover and set aside for 10 minutes. The dried onion flakes will absorb any extra moisture from the dough.
.Pre-heat the oven to 230 degree C/445 degree F/gas mark 8.
.Divide the dough into 2 and gently form into ball shapes.
.Roll out the dough on a lightly floured surface with a rolling pin that has been rubbed with flour
 into 1/2 cm thick circles.
.Using a cookie cutter of approximately 1 inch diameter cut out shapes.
.Re-shape the remaining dough (from cut-outs) till all of it is used.
.Place on a lightly greased cookie tray and bake for 8-10 minutes or until they turn a golden brown.*
.Cool on a wire rack for 3 to 4 minutes.
.Serve immediately topped with grated cheddar cheese and finely chopped chives or any other topping
 of liking.

For Cheesy Yogurt dip
.Mix together all the ingredients and serve along with the scones in a bowl.

Note:
.The time taken may vary slightly depending on the thickness of the scone.
.These are crisp on the outside with a lovely delicate taste.
.If they get cold just warm them in the oven.


cheesy potato and chive scones